Showing posts with label Grids. Show all posts

Tuesday, August 07, 2018

Triangular Grids

I am a fan of using grids for miniature wargaming. My wargaming table has a permanent Hexon terrain system laid out, but I've also played games on a rectangular grid, most notably my Flagstone Fleets game. See also the Table of Contents for previous discussions about grids.

In this blogpost, I would like to discuss the triangular grid. I think it's a grid that has not been fully explored in wargaming (hexagonal grids and square grids are getting much more attention), but it is worthwhile to look at some of its advantages and disadvantages.

Relation between the triangular and hexagonal grid

There is a strong relation between the classic hexagonal tiling, and a triangular tiling.


Mathematically, they are each other's dual tiling. This means that if you take the centre points of each hexagon, and you connect these centre points together, you get the triangular tiling. This also works in the other direction: if you take the centre points of each triangle, and connecting them together, you get the hexagonal tiling.

This duality results in a nice property: when playing a game on a triangular grid: placing the pieces on the corner points and moving them along edges, is equivalent to playing that game on a hexagonal grid by placing the pieces inside the hexagons and moving them across edges. And vice versa, playing a game on the corners and along edges of a hexagonal grid, is equivalent to putting the pieces in the triangles and moving them across edge boundaries.

There is however a major issue with the triangular grid, which is the asymmetry of connections between the triangles. Unlike a hexagon grid, triangle can connect edge-to-edge, but also point-to-point in various configurations. THis is also the case in a square grid, but in a triangular grid there are different ways in which triangles can connect point-to-point. This lack of symmetry is the most likely reason why triangular tiles have not been really considered for wargaming.

Has the triangular grid been used before?

When trying to look up whether (board) wargames make use of a triangular grid, surprisingly few results turn up. Most of the games that use a triangular grid, use the dual property, effectively using a hexagonal grid. The triangular grid is then merely an esthetic element in the design of the game. See e.g. games that employ the "Triangle System", See also this page at Forsage Games.

Most games that use the triangles themselves as areas usually are abstract boardgames. Some examples are: Blokus Trigon or Go played on a triangular grid.

Counting distances

Let us assume we do want to design a miniature wargame using a triangular grid. One of the things we need is a counting procedure for counting distances from one grid cell to another cell, and preferably, we would like that counting procedure to approximate the Euclidean distance between the centre points of both grid cells.

Using some simple goniometry, and setting the distance between the (barycentric) centre points between 2 adjoining triangles to 1, we arrive at the following relations:


Taking the red dot as starting point, we see that we can get to edge-to-edge triangles (yellow dots) using distance 1. The triangle directly opposite (blue dot) requires distance 2. Both triangles that touch the starting triangle, but are not directly opposite (yellow dots), are at a distance equal to the square root of 3, or 1.73.

Rounding up 1.73 to 2, we get the following, rather simple, counting procedure for measuring distances:
  • When moving from edge-to-edge, count 1;
  • When moving from point-to-point (any configuration), count 2.
This looks like a nice and relatively simple procedure for counting distances. Another way to look at this, is to construct a hexagonal grid on top of the triangular grid, by inscribing each triangle with a hexagon, and putting additional hexagons at the corner points (note that this is a different hexagonal grid as opposed to the dual grid as described above):

(Image from "20 Fun Grid Facts (Hexgrids)")
The yellow and blue triangles (or the yellow and blue hexagons) form our triangular grid. When moving from a yellow to an adjacent blue hexagon (i.e. moving on the triangular grid from a yellow to a blue triangle), you can do that directly, at a cost of 1 movement point. But when you move to a hexagon whose corresponding triangle is touching at a corner, you have to pass through a green corner hexagon, resulting in 2 movement points if you would count along the hexagonal grid. So, our distance rules derived above can also be considered as moving on the underlying hexagonal grid - albeit by disregarding the green hexagons as shown in the diagram above.
(You might wonder how this is possible, given that we have rounded one distance 1.73 to 2 ... but there are also 2 modes of moving on a hexagonal grid: straight ahead from hexagon to hexagon, or in a "zig-zag" pattern, which correspond to our differently connected triangles ... these two movement paths are not exactly equal, although we often consider them as such on the hexagonal grid.)

Ok, let's put it all together. How far can we move on a triangular grid given various amounts of movement points? The diagram below illustrate the movement ranges, using 1 movement point to move across an edge, 2 movement points to move across a corner.

The blue, green and orange triangles indicate the range using 3, 5 and 7 movement points. The dotted black arcs have radius equal to 3, 5 and 7. The dotted red arcs are scaled with a cosine(30 degrees) factor. This allows comparing the "zig-zag" movement when one would move along the horizontal row of adjacent triangles.

Facing, Battlelines and firing arcs

When located in a triangle, a unit can be oriented in 12 different directions: 3 sides, 3 corners, but there also 6 other directions that line up with rows of triangles (see diagram below). This is not unlike a square grid where you have 8 natural facings, or a hexagonal grid that has 12 facings (6 edges + 6 corners).
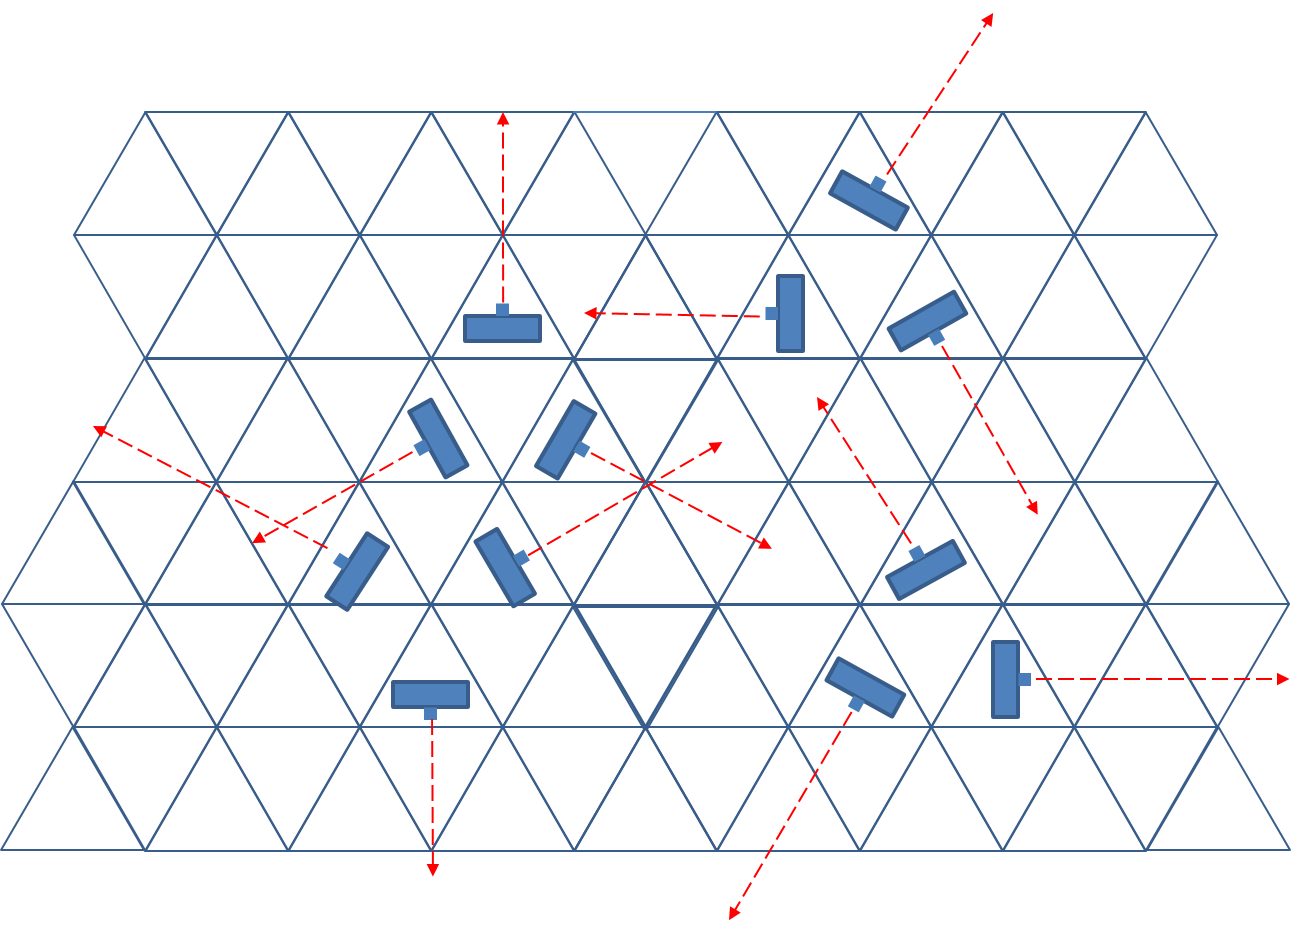
Square grids have 3 natural main directions along one which can put troops next to each other: vertical, horizontal, and diagonal. A hexagonal grid has 3 main directions, and 3 "zig-zag" directions. What about the triangular grid? The triangular grid also has 6 main directions, as shown below (the 2 other symmetric directions at 30 and 60 degrees are not shown).


The orientation and facings, having 12 "natural" directions on the grid, might be the biggest advantage of the triangular grid. However, just an in squares, the connections between the grid cells is asymmetric. But this is also the case when considering the "zig-zag" directions in a hexagonal grid.

Firing arcs become a little more complex. The diagram below shows firing arcs at 60 degrees, and a distance of 4, using the counting metric as derived above. Note the little discrepancy in the firing arc for the unit on the right.


All this seems workable, but it takes time getting used to.

Conclusion

So, should we use the triangular grid for our miniature wargames? Honestly, I don't know yet. I will have to run a test game or two ... but any other experiences or insights are certainly welcome!

Thursday, July 26, 2018

Grids and Miniature Wargaming ... a never-ending discussion

Introduction

Grids for miniature wargaming are regularly discussed on various forums. Often, such discussions revolve around the procedure for counting distances along the grid. Often, the grids under consideration are either the hexagonal grid, the square grid, or the offset square grid (the so-called brick pattern, which is topologically equivalent to the hexagonal grid for most purposes).

However, there are many other types of grids. In mathematics, grids are well studied and also referred to as "tesselations" or "tilings of the plane". Different constraints can be put on such grids: should all grid cells have the same size and/or shape? Should the grid have a repeating pattern? Should the grid never have a repeating pattern? See this wikipedia page for an introduction to the topic.

Just to get your brain juices flowing, here are some specific pentagonal tilings (a pentagonal tiling uses pentagons). Would it be possible to use such a tiling for a miniature wargame?

The 15th monohedral convex pentagonal type, discovered in 2015
The "Cairo" pentagonal tiling.
Many of you would shudder at using such a grid, but why is that exactly? After all, there are plenty of examples of irregular grids that have been used in board wargames, also known as "area-based  movement" to distinguish them from "hex-based  movement".

Storm over Arnhem often is credited to be one of the first board wargames to use area movement, but a boardgame classic such as Risk uses area movement as well, as do countless other board(war)games.

Grid used in Storm over Arnhem. Image from Boardgamegeek.com
Risk map. Image from Boardgamegeek.com
Why do we not consider such playing grids for miniature wargames, and typically restrict ourselves to either a hexagonal grid or a square grid? After all, it should be easy enough to place miniatures in a grid cell, and move them from cell to cell, just as we do in such boardgames?

For miniature wargaming, we often need more functionality from the grid than simply moving playing pieces from cell to cell. More specifically, we need the following:
  • A movement procedure for miniatures or units on the grid;
  • A procedure for determining shooting ranges;
  • A way to orient miniatures or units relative to the orientation of the grid;
  • Align units to adjacent gridcells, such that we can make linear battlelines;
We will discuss each of these issues below.

Movement on the grid

This is the topic that usually gets most of the attention when discussing grids for miniature wargaming. Often, people try to come up with ways to move units on a square grid such that the distortion for diagonal movement is corrected. See also the previous blogposts Square Grids and Square Grids (2) on the topic, in which I also explain that we do not want a measurement procedure (measure a movement distance from starting cell to end cell), but rather want a counting procedure (count expended movement points when moving one cell to an adjacent cell).

In principle, it's very easy to come up with a counting procedure - simply count the number of cells as you move along. However, we want to take into account the various connections between cells. If connections are not symmetric (as in the case of a square grid), movement might become a bit more complex. In irregular-shaped grids, it might become very complex.

Movement on the Cairo grid. Each cell counts as 1 movement point, only edge-to-edge movement allowed.
Movement on the Cairo grid. Each cell counts as 1 movement point, edge-to-edge and point-to-point movement allowed.
Then why do some board(war)games use irregular grids? Usually, because movement is restricted to moving only 1 area, or perhaps 2. In such cases, the total movement distortion when compared to the "true" Euclidean distance is less of an issue.

Moreover, the irregular shaped cells can often serve a purpose. Difficult terrain can be turned into smaller grid cells, and easy-going terrain into larger grid cells, thereby avoiding different movement point costs for different types of terrain.

In miniature wargames, we are so used to having movement speeds doubled or halved depending on terrain, that we usually don't consider irregular grids for that purpose. Often, we prefer regular-shaped grids, and stick to different movement points for different types of terrain. But this also has a reason. Miniature wargames - unlike board wargames - often employ a different terrain setup for each game. Having your irregular grid reflect the terrain sounds like a great idea if you have a fixed map for each and every game, but when you want to shuffle terrain around for each game, a practical solution is not immediately feasible. However, this should not prohibit us from using irregular grids, since different movement values depending on terrain in a specific grid cell is still a possibility.

Shooting ranges on a grid

Most miniature wargaming rules require us to measure the distance between a shooter and a target. Again, as in a movement procedure, we rather want a counting procedure rather than a measurement procedure. We usually want to be able to count the number of cells that lie between the shooter and the target, and use this number as the shooting distance to determine whether the target is in range, whether modifiers need to be applied, and so on.

This is the real bottleneck for using irregular-shaped grids in miniature wargaming. Although we can imagine counting the number of cells, on an irregular grid we might be left to wonder whether it is the shortest distance possible. Especially when the size of the gridcells reflect the type of terrain as mentioned above, the counted shooting ranges can become really distorted, and it would allow you to shoot further if the intermediate terrain is easy-going and suddenly reduce your range when you difficult-to-traverse grid cells lying in front of you. Hence, counting shooting ranges requires cells more or less of equal size.

However, if your ground-scale is such that shooting is restricted to adjacent cells, this is not really a strong requirement. Some distortion might pop up, but no more as in the many boardgames that use an irregular grid and allow adjacent combat only.

Related to determining the shooting range is the issue of visibility. On hexagonal or square grids, the line-of-sight is checked vs intermediate grid cells and terrain therein that might block the line of sight. Because of the regularity of the grid, deciding what cells are crossed by the shooting line can often be eye-balled. But not so in an irregular grid, where this would become more complex, unless you limit shooting ranges to 1 or 2 cells.

Orientation of a unit within a gridcell

Miniature wargames often stipulate firing arcs for units when shooting. When playing on a grid, this means positioning units in a specific orientation on the grid (facing an edge, facing a corner, ...), and defining shooting arcs in terms of grid cells. Often, such a shooting arcs takes the form of a "wedge". In the case of hexagonal and square grids, this is often straightforward, but for irregular grids, this again is a non-trivial procedure if your shooting range extends to 2 cells or more. Even a shooting arc of 180 degrees becomes non-trivial to determine.

Alignment of a unit to adjacent grid cells

Another issue that has to with alignment, is the alignment of adjacent cells, and hence adjacent units. Some periods in which linear warfare is a major element on the battlefield, require that you can line up units next to each other. Easy to do on a square grid (at least in the horizontal and vertical direction, and perhaps the diagonal one), a bit less easy to do an a hexagonal grid (although there are 3 main axes each at 60 degrees where this is possible, but not orthogonal), but almost an impossibility if you use an irregular grid.

However, if the game is a skirmish game (no lineair formations needed), or set in a modern period (spread-out troops), this is less of an issue.

Conclusion

Taking all of the above into account, we want a grid that:
  • has uniform, regular, more-or-less equal-sized cells, such that we can have an easy counting procedure.
  • allows for easy orientation of units inside a cell and alignment with adjacent cells.
This brings us mathematically to uniform convex tilings, tilings which consist of regular polygons. When we take a look at the list of these tilings , we encounter the usual hexagonal and square grids, but there is also at least one other tiling which might prove to be useful to miniature wargaming, but which has (at least to my knowledge) not really been explored: the triangular tiling.

Triangular tiling
I think the triangular grid has a number of unexplored advantages, not in the least advantages in terms of alignment. However, it has asymmetric connections (both edge-to-edge and point-to-point) which might make a counting procedure more difficult. But we'll keep a full analysis for a future blogpost!

Addendum
  1. As can be expected, the discussion of grids (and especially hexagonal grids) has a long tradition in board wargaming. See e.g. this discussion on boardgamegeek
  2. I also wrote a follow-up post n triangular grids.

Wednesday, January 03, 2018

Square Grids (2)

In a previous post ("Square Grids") we outlined several methods how to measure distances on a square grid, with the aim of approaching the Euclidean distance as closely as possible.

One of the possible solutions is to count a diagonal move as 1.5 movement points. Such a procedure allows for a more accurate movement compared to not allowing diagonals, or counting diagonals as 1 movement point.

However, one could take this a step further and also define movement points for other types of movement. E.g., we can define a number of movement points when executing a Knight's move (as in chess, 2 squares horizontally, 1 square vertically, or vice versa). Using Pythagoras' Theorem, one can easily compute that such a distance equals the square root of 2*2 + 1*1 = square root of 5 = 2.236, or approximotely 2.25.

Hence, let us define movement on a square grid as follows:
  • 1 movement point for a horizontel or vertical move;
  • 1.5 movement points for a diagonal move;
  • 2.25 movement points for a Knight's move.
The resulting movement ranges, for 3, 5 and 7 movement points, are illustrated in the diagram below. The dark shaded squares are the ones we can reach when rounding our movement allowance down, i.e. we can spend up to 3.5, 5.5 or 7.5 movement points.

Diagonal movememtn counts as 1 movement point; a Knight's move counts as 2.25 movement points.
Dark shaded squares indicate an expenditure 0.5 movement points above the nominal number.
The overal picture, especially when compared to the diagrams in the previous blogpost, is that we can approach the circle (the ideal Euclidean distance) even better.

And why stop here? We could define custom movement points for a move that would take us 3 squares forwards and 2 squares sideways ( a so-called Zebra move in chess), or a move that would take us 3 forwards, and 1 sideways (a Camel move in chess -- both Zebras and Camels are called "leapers" in the context of fairy chess pieces), etc. The more we include these special "moves", the closer we can get to approaching the ideal Euclidean distance. In the limit, every possible movement between a starting square and end square can be given its own customized movement point cost.

"But such a system would become totally unworkable!", I hear you say. Quite right, it would become unworkable, working with fractions, and remembering all those special moves with their own movement points expenditures.

That's why - in a wargame that uses a gridded playing field - we don't really want a measurement procedure, we want a counting procedure. There's a subtle difference between both. A measurement procedure would express the movement cost between two gridcells on the playing field. But a counting procedure is what we need when playing. We want to to go from gridcell to gridcell, physically moving the figures (or using our finger to point out the movement path), while counting and accumulating the spent movement points as we proceed along the movement path. Thus, complicated counts such as the Knight's move, the Camel move or the Zebra move, do not fit that pattern.

It is tempting to play around with more complicated counting procedures, but I think the game will suffer. And, the more complicated counts we include and the closer we approximate Euclidean distances, the more we should think about removing the grid and use a ruler in the first place!

Sunday, June 25, 2017

Square Grids

Some wargamers (including me) like to use grids for their games. For some types of games they work wonderful, for others, not so much. I know that some wargamers are vehemently opposed against using grids in miniature wargaming, but I simply consider them to be one of many tools you can use when designing a game.

One of the recurring debates when using grids is whether to use a hexagonal grid, or a square grid. The main objection against square grids is diagonal movement. Moving to a diagonal adjacent square covers more distance on the 2D surface compared to a horizontal or vertical move. Pythagoras' theorem says that - if the distance measured from centre to centre between horizontally and vertically adjacent squares is equal to 1 - the diagonal distance equals the square root of 2. Any calculator will show you that the square root of 2 is 1.4142... , but for gaming purposes, 1.5 is close enough.

This article looks at some of the solutions one can use to address the discrepancy caused by diagonal movement on square grids.

Diagonal movement allowed, and counts as 1

The  simplest solution is just to ignore the issue at all, and consider diagonal movement equal to horizontal or vertical movement. Or, in other words, a diagonal move expends 1 movement point, just as well as movement in any of the other 2 directions.

The diagram below shows what squares you can reach using this method, when starting at the red square at the bottom-left. Movement distances of 3, 5 and 7 are shown in blue, green and orange. The circle arcs show the "true" Euclidean distance from the centre-point of the red square.

Diagonal movement counts as 1 movement point
It's rather obvious that the discrepancy becomes larger if the movement distance increases. This is not unsurprising. But is also means that for small movement distances (1,2,3), such things don't matter that much.

No diagonal movement allowed

The other end of the spectrum of possible solutions is to simply disallow diagonal movement at all. Only horizontal and vertical moves are allowed. This corresponds to what mathematically is known as the Manhattan distance - moving on a grid where you have only streets and avenues at 90 degree angles.

No diagonal movement is allowed
Again, we make significant errors, but we now "undershoot" the true distance. And as you can see, the effect on low movement rates is rater small.

Diagonal counts as 1.5

A good solution would be to count diagonal movement for its true distance, namely the square root of 2 (1.4142), or rather, its approximation by 1.5. This is a bit awkward, since you have to count using halves when moving diagonally, but it provides a nicer approximation to the circle. The diagram below shows the squares you can reach using this method, when not exceeding the movement allowance, and thus sometimes leaving 1/2 movement point unused. 

Diagonal movement counts as 1.5
You could also rule that you can go over by 1/2 - thus, you can use 7.5 movement points instead of 7. What we are doing then is introducing a "rounding down movement points" rule. It allows you to move the additional square here and there, as shown below. Nevertheless, it is a bit strange, since it goes against a well-established convention in wargaming, that you can never use more movement points than you have available.

Diagonal movement counts as 1.5, but going over by 0.5 is allowed
If you do not want to use the half movement points, you could also double all movement points, and count 2 movement points for a straight move, and 3 movement points for a diagonal move. But then all your other movement point expenditures (terrain, obstacles, ...) need to be doubled as well.

Addendum: see also the blogpost "Square Grids (2)" for including Knight's moves as well.

At most 1 diagonal movement allowed

This mechanic does exactly as it says. I consider it not very elegant, because you have to remember whether you already used up your diagonal movement or not, and somehow, players find this confusing, especially because you have to count at the same time.
What this rule actually does is to extend the "no diagonals allowed" movement pattern by one square outwards.

At most 1 diagonal movement allowed
-1 movement penalty when using any diagonal - a.k.a. +1 movement when you move straight

Again, this mechanic works exactly as it says in the title. If you use any diagonal movement, your movement penalty allowance is decreased by 1. It is an easy to use mechanic. An easier formulation of this mechanic is that you gain +1 movement point if you move on a straight horizontal or vertical line (this requires redefining your original movement rates by -1). The latter formulation is easily to see visually on the diagram, when you compare it to the "diagonals allowed" procedure.

Movement is reduced by 1 is you use any diagonal (or gain +1 when moving straight)
1 / 2 / 1 / 2 alternation

This is a variant on the 1.5 mechanic. If you don't like counting using halves, we can do an approximation by counting the first diagonal as 1, the second as 2, the third again as 1, and so on. On average, this means a diagonal is counted as 1.5. I consider this not a very elegant mechanic, since you have to remember where you were in the sequence. But, similar to the 1.5 rule, it approximates the circle very well, and is essentially the same as the 1.5 rule, with the variation of spending the extra 1/2 movement point.

First diagonal counts as 1, 2nd counts as 2, 3rd counts as 1, ...
2 / 1 / 2 / 1 alternation

A simple variation of the previous mechanic,  but we start by counting the first diagonal as 2 movement points. The effect is that we are able to move a little less further, because the first diagonal is more expensive, and if we use an odd number of diagonals, it does cost more than in the previous procedure. We get the same diagram as the basic 1.5 diagram.

First diagonal counts as 2, 2nd counts as 1, 3rd counts as 2, ...
Facing

A factor that might make things a bit more complicated is when facing is important. E.g. in a naval game, a ship might only be able to move forward in its current direction, and THEN only turn 45 degrees. The choice of mechanic might be dependent  on these additional constraints. E.g. in our Flagstone Fleets outdoors naval games (using the flagstones on the patio as our grid), we used the "+1 if you move straight" rule. It worked out well using the facing rules and the movement distances we employed.

Conclusion

Overall, I like either the "diagonals count as 1.5" for larger movement distances, or the "+1 if you move straight" for small movement distances, the most. I think they combine the approximation of the circle with an elegant an easy mechanic in the best possible manner.

Addenda